In this module we're going to take what we made in Tutorial 3, our small model of the street trees of upper Manhattan, and turn it into a sandbox like the examples on this site: a page with a map, a clock, and some sliders. The numbers we typed into the notebook last week become sliders, and the clock lets you scrub the run from 2015 to 2045 and watch the totals change.
A page like this is a fairly complex piece of JavaScript; making it from scratch would be a significant endeavor. This tutorial will use an AI coding agent to build the app, from our natural language instructions. A coding agent is similar to a chatbot like Claude or ChatGPT, but with access to a folder on your computer where it can read / write files, and run scripts.
Working this way has come to be called vibe coding, or writing code using natural language, a term coined by the computer scientist Andrej Karpathy in early 2025. I know the term connotes a kind of relaxed image, but used correctly, it can be just as intellectually engaging as writing code. In this tutorial, we will stay at a high-level, and think about what we want to make more than how to make it. I often like to make the argument that because AI models can write code for you, that shifts greater importance to the ideas and intentions behind the work. Used without rigor, AI tools produce mediocre work - they literally reproduce an average of the internet.
A note before we start: this is going to be a little different for everyone, since we won't all be using the same agent, and these tools change every few weeks. If something doesn't match what you see on your screen, that's fine, ask, and we'll figure it out.
Setup
The environment and the model
Claude Code, Codex and Gemini CLI are AI development environments. Claude, GPT and Gemini are the models inside them. The environment is the part that reads your files and runs commands; the model is the part that decides what to do. Most environments can be pointed at more than one model, and most models show up in more than one environment, so you'll see the same names in different combinations.
Here are a few of each. Some of these run as an extension in a text editor, in the command line interface of your terminal, or as a standalone app. I've kept the notes short, since all of this changes every few months and I'm sure I'll be out of date by the time you read this.
Environments (coding agents):
- Claude Code (Anthropic). Runs in the terminal, or as an extension inside a text editor.
- Codex (OpenAI). The same idea, with OpenAI's models. Terminal and a text editor extension.
- Gemini CLI (Google). Also terminal, and a text editor extension called Gemini Code Assist.
- Cursor. A text editor with an agent built in.
- Antigravity (Google). Google's text editor, built around Gemini.
- OpenCode. Open source, runs in the terminal, and can use many different models, including ones running on your own computer. My hope is that next year we will be using this in this course, but as of now it requires too much overhead.
Models:
- Claude (Anthropic).
- GPT (OpenAI). The models behind ChatGPT.
- Gemini (Google).
- GLM (Zhipu AI). Released with open weights, which means you can download it and run it yourself.
- Qwen (Alibaba). Also open weights.
- Kimi (Moonshot AI). Also open weights.
For this tutorial I'm going to run a coding agent inside a text editor, VS Code, so that my files, the agent and the terminal are all in one window. I am choosing this setup so that you can write your prompt, use an AI model, see the files that it generates, and edit them all in the same interface.
I'll be using Claude Code via the VS Code extension, but Codex and Gemini Code Assist both have VS Code extensions too, and Cursor and Antigravity are editors of their own that you'd use instead of VS Code. Any of these should work for this tutorial; the changes between each should be quite minimal.
Unfortunately, each needs an account with the company that makes the model. I believe that Cursor has a free tier - which may be just enough for this tutorial. But likely you will need a paid plan that is typically $20/mo. Last I checked I believe OpenAI may have a free trial.
If this isn't an option for you, just schedule an office hour, prep your files for assignment 4, and we can run them together using my account.
Download VS Code
Let's download VS Code from code.visualstudio.com and install it. It's free. If you've never used a text editor before, don't worry; it's really not much different than your notes app, or Notepad on Windows.
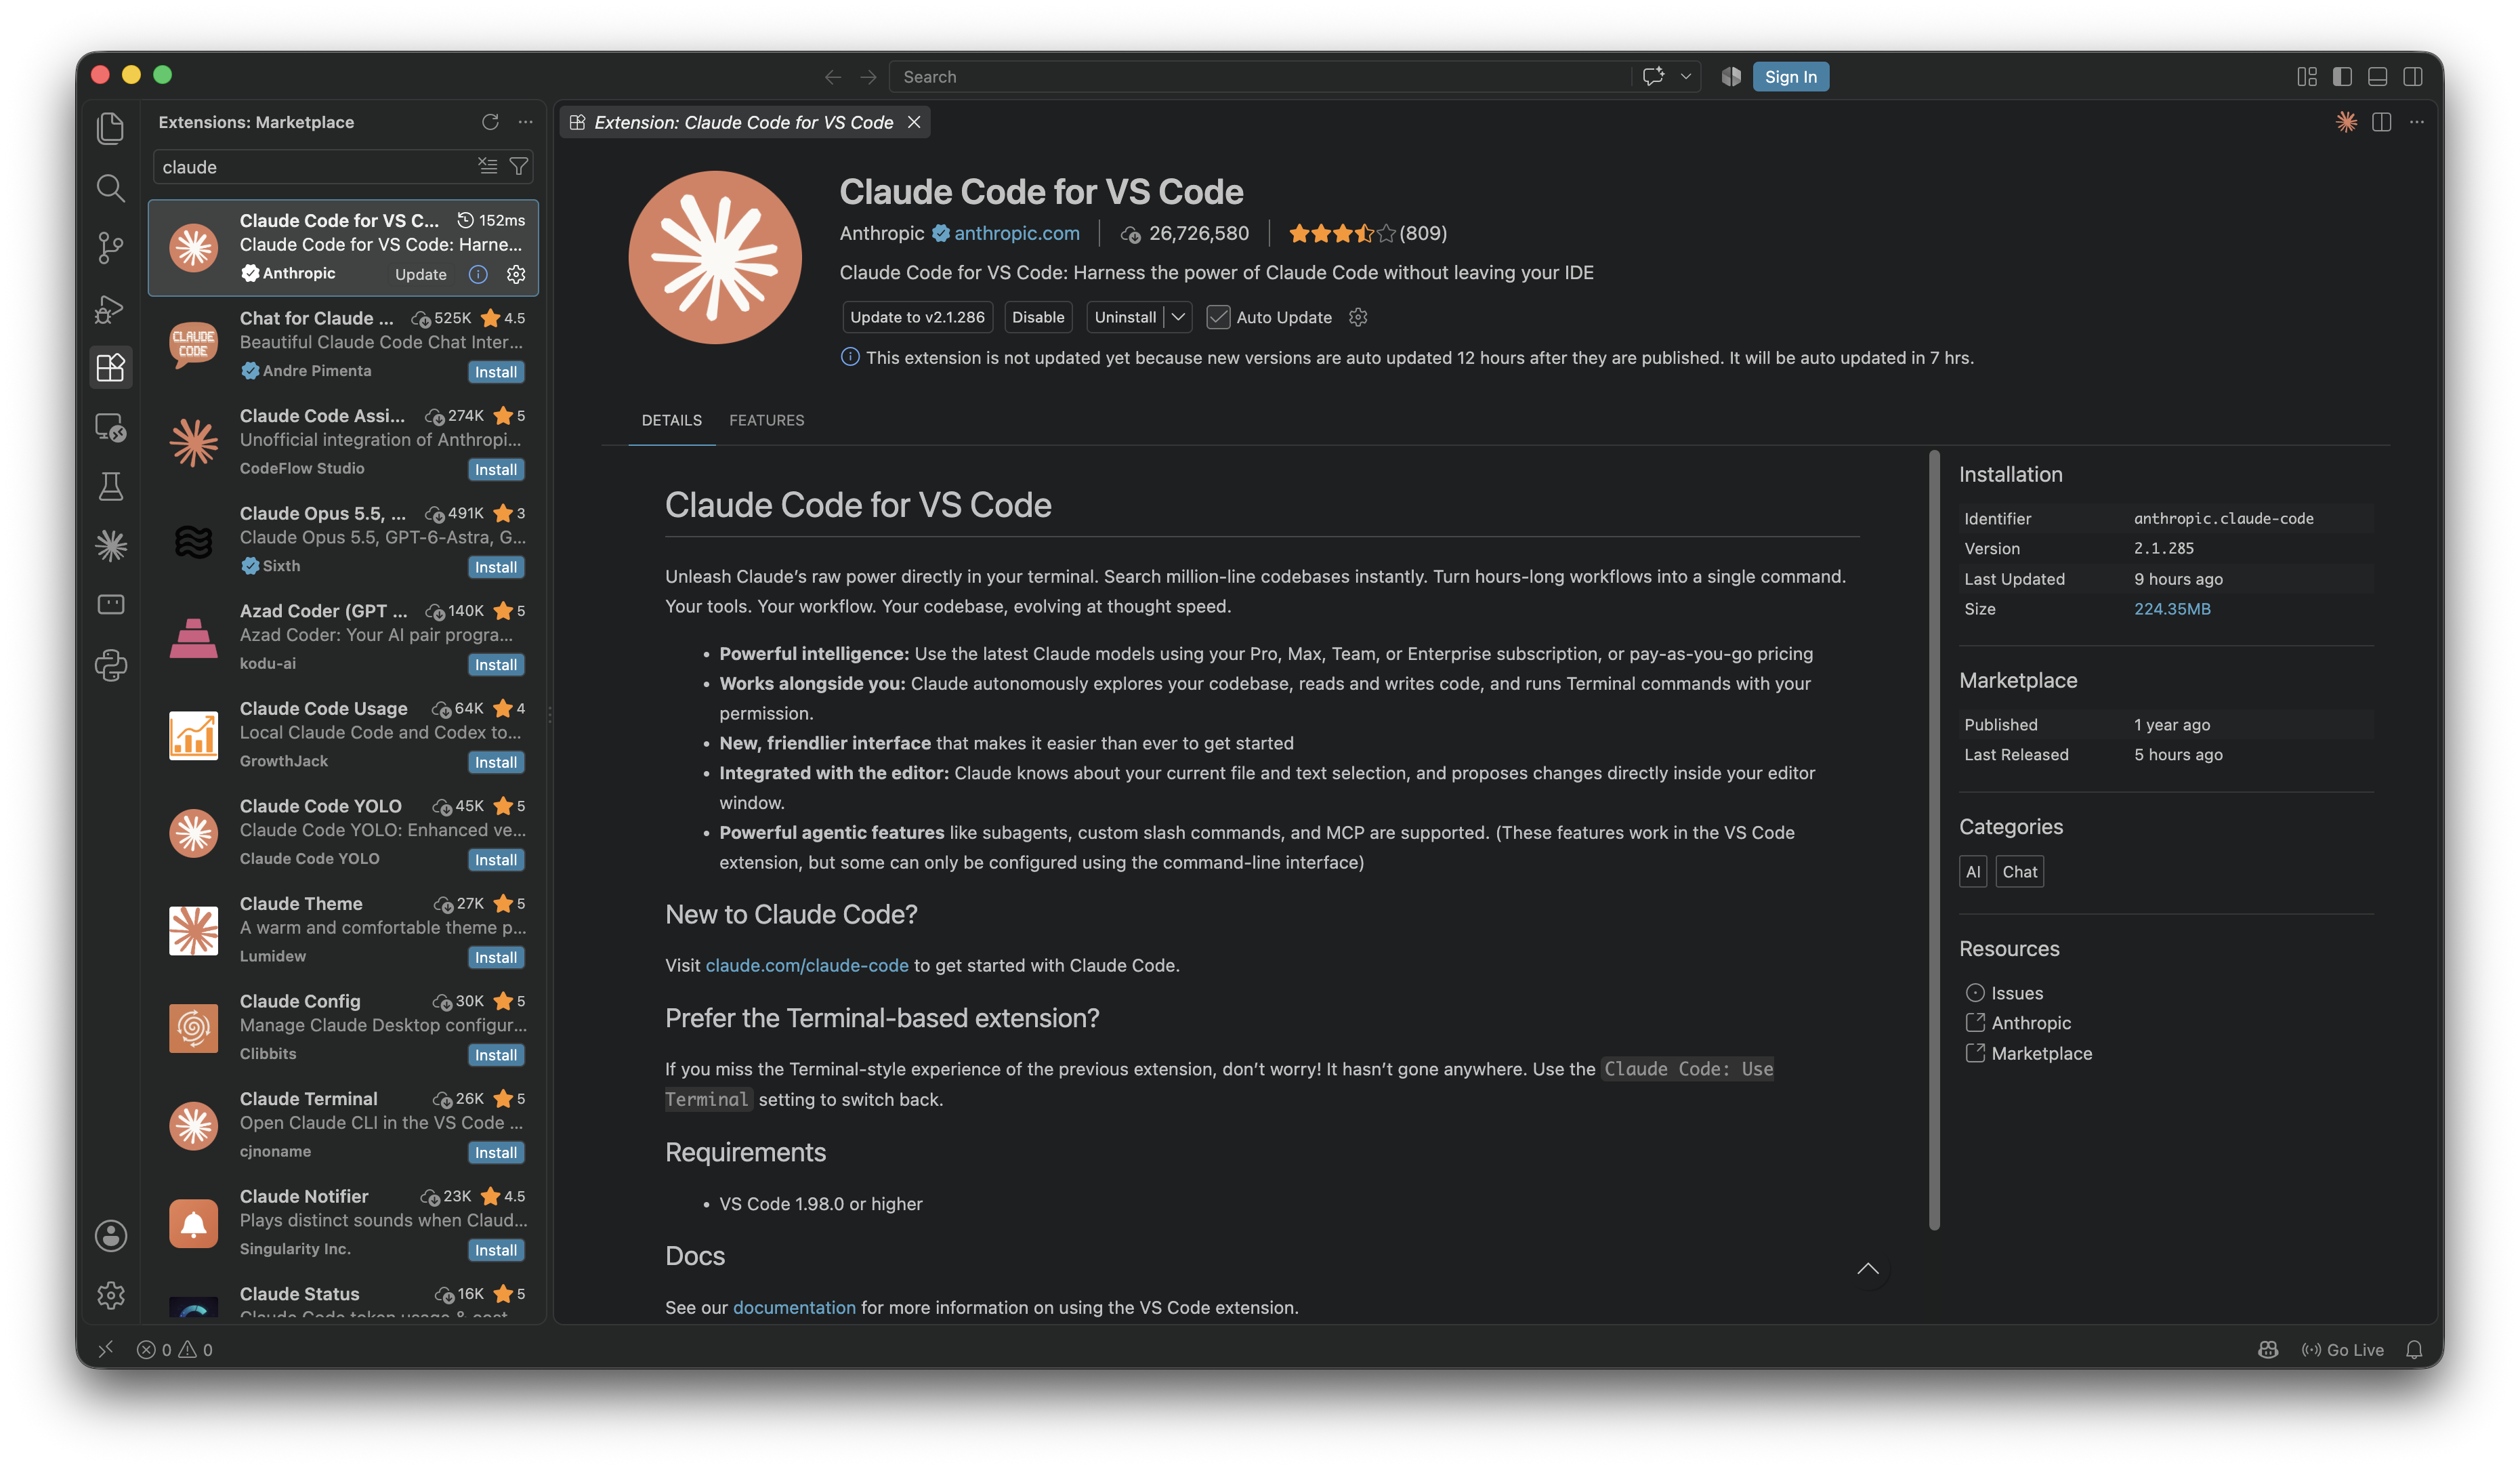
Then let's install the agent. For Claude Code, open VS Code, click Extensions in the left bar, search for Claude Code, and click Install. It'll ask you to sign in. For the others it's the same, with their name.
Make a folder
Make a new folder somewhere on your computer called tutorial-4. Everything for this tutorial goes in it.
Download the data
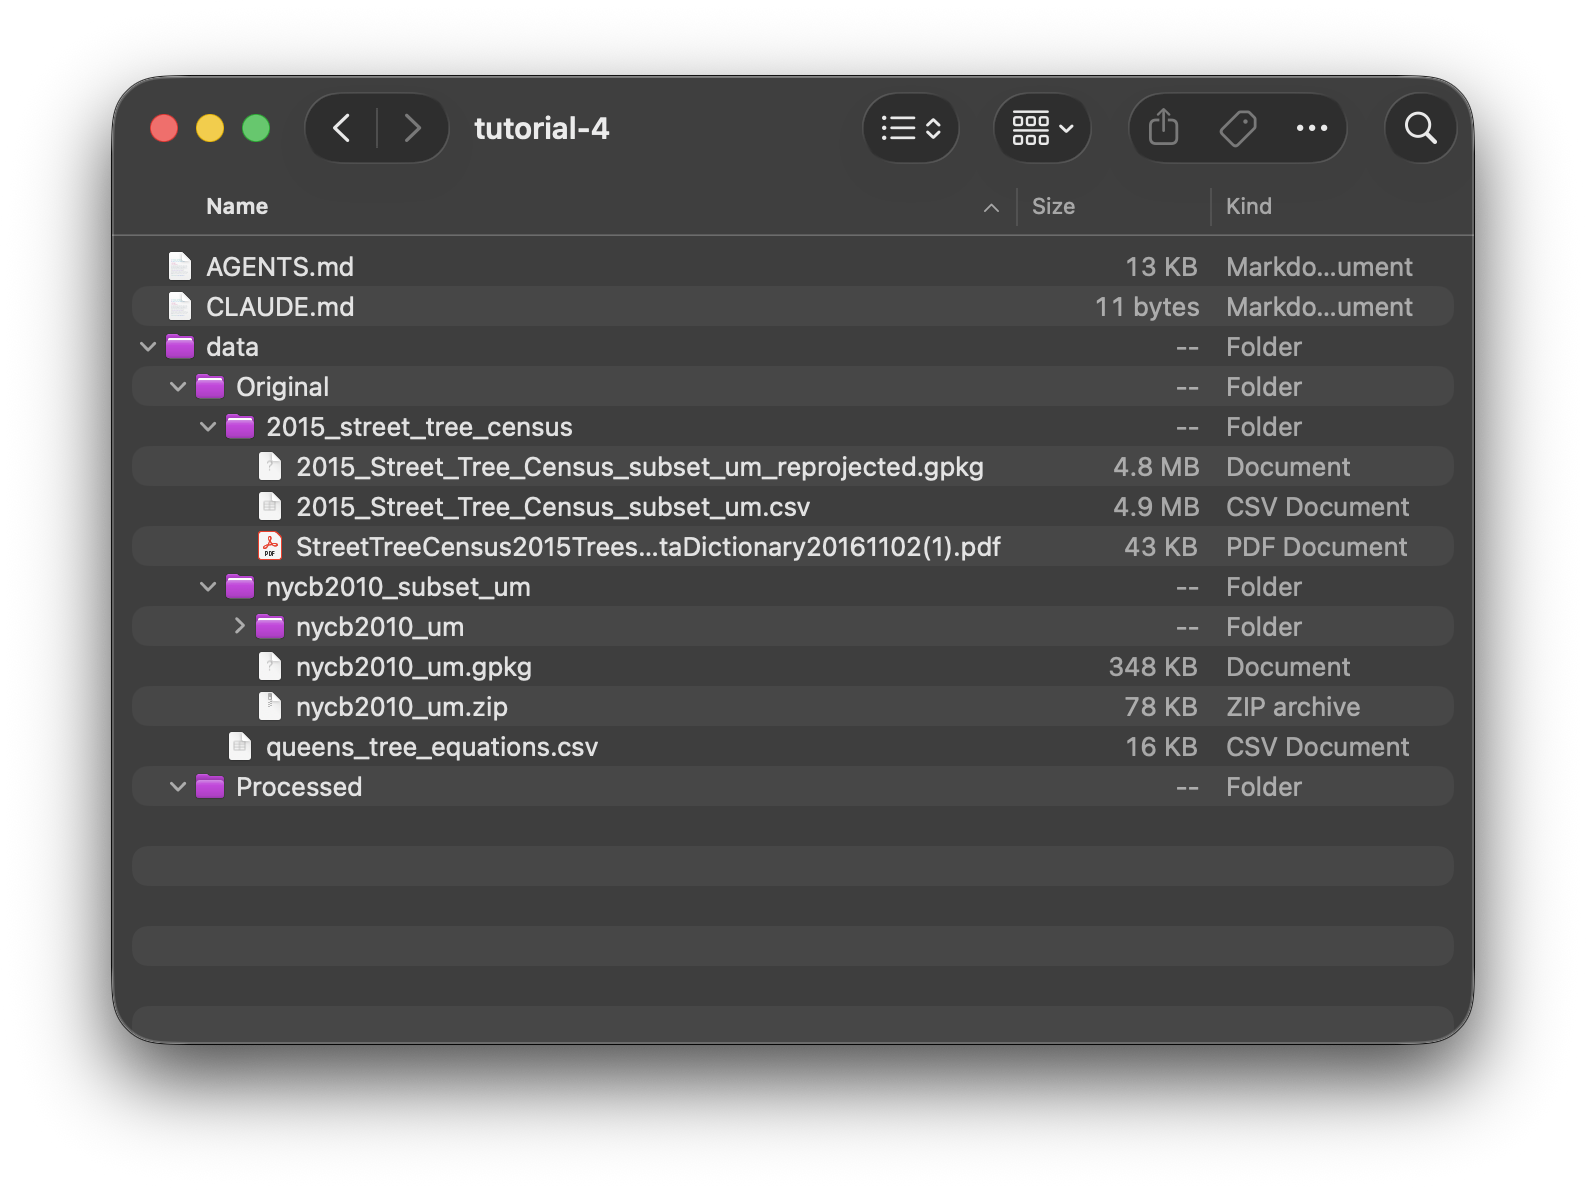
We're going to set up our files the same way as we always do. Inside your tutorial-4 folder create a data folder, and inside that an Original and a Processed folder. All downloaded datasets should be saved in the data > Original folder. Any new datasets made from them should be saved within the data > Processed folder.
Put these datasets in your Original folder. You can find them in the course folder under data/04-notebook-to-sandbox.
2015_street_tree_census, the folder with the street trees (2015_Street_Tree_Census_subset_um.csv) and its data dictionary.nycb2010_subset_um, the folder with the census blocks (nycb2010_um.gpkg).queens_tree_equations.csv, the species equations.
Download the course kit
Now download smt-kit.zip and unzip it. Inside is a folder called smt-kit, with a file called AGENTS.md and a couple of others. Move everything inside smt-kit into your tutorial-4 folder, next to data. AGENTS.md is a set of instructions I've written for your agent: what a sandbox is in this class, what the file it makes has to look like, and how I'd like it to work with you. Every coding agent reads a file with this name when it starts up in a folder, so you don't have to do anything with it except leave it where it is. Feel free to read it, though.
After that setup, your folder should look like the below:
Open the folder in VS Code
In VS Code, File > Open Folder and choose tutorial-4.
Start the agent
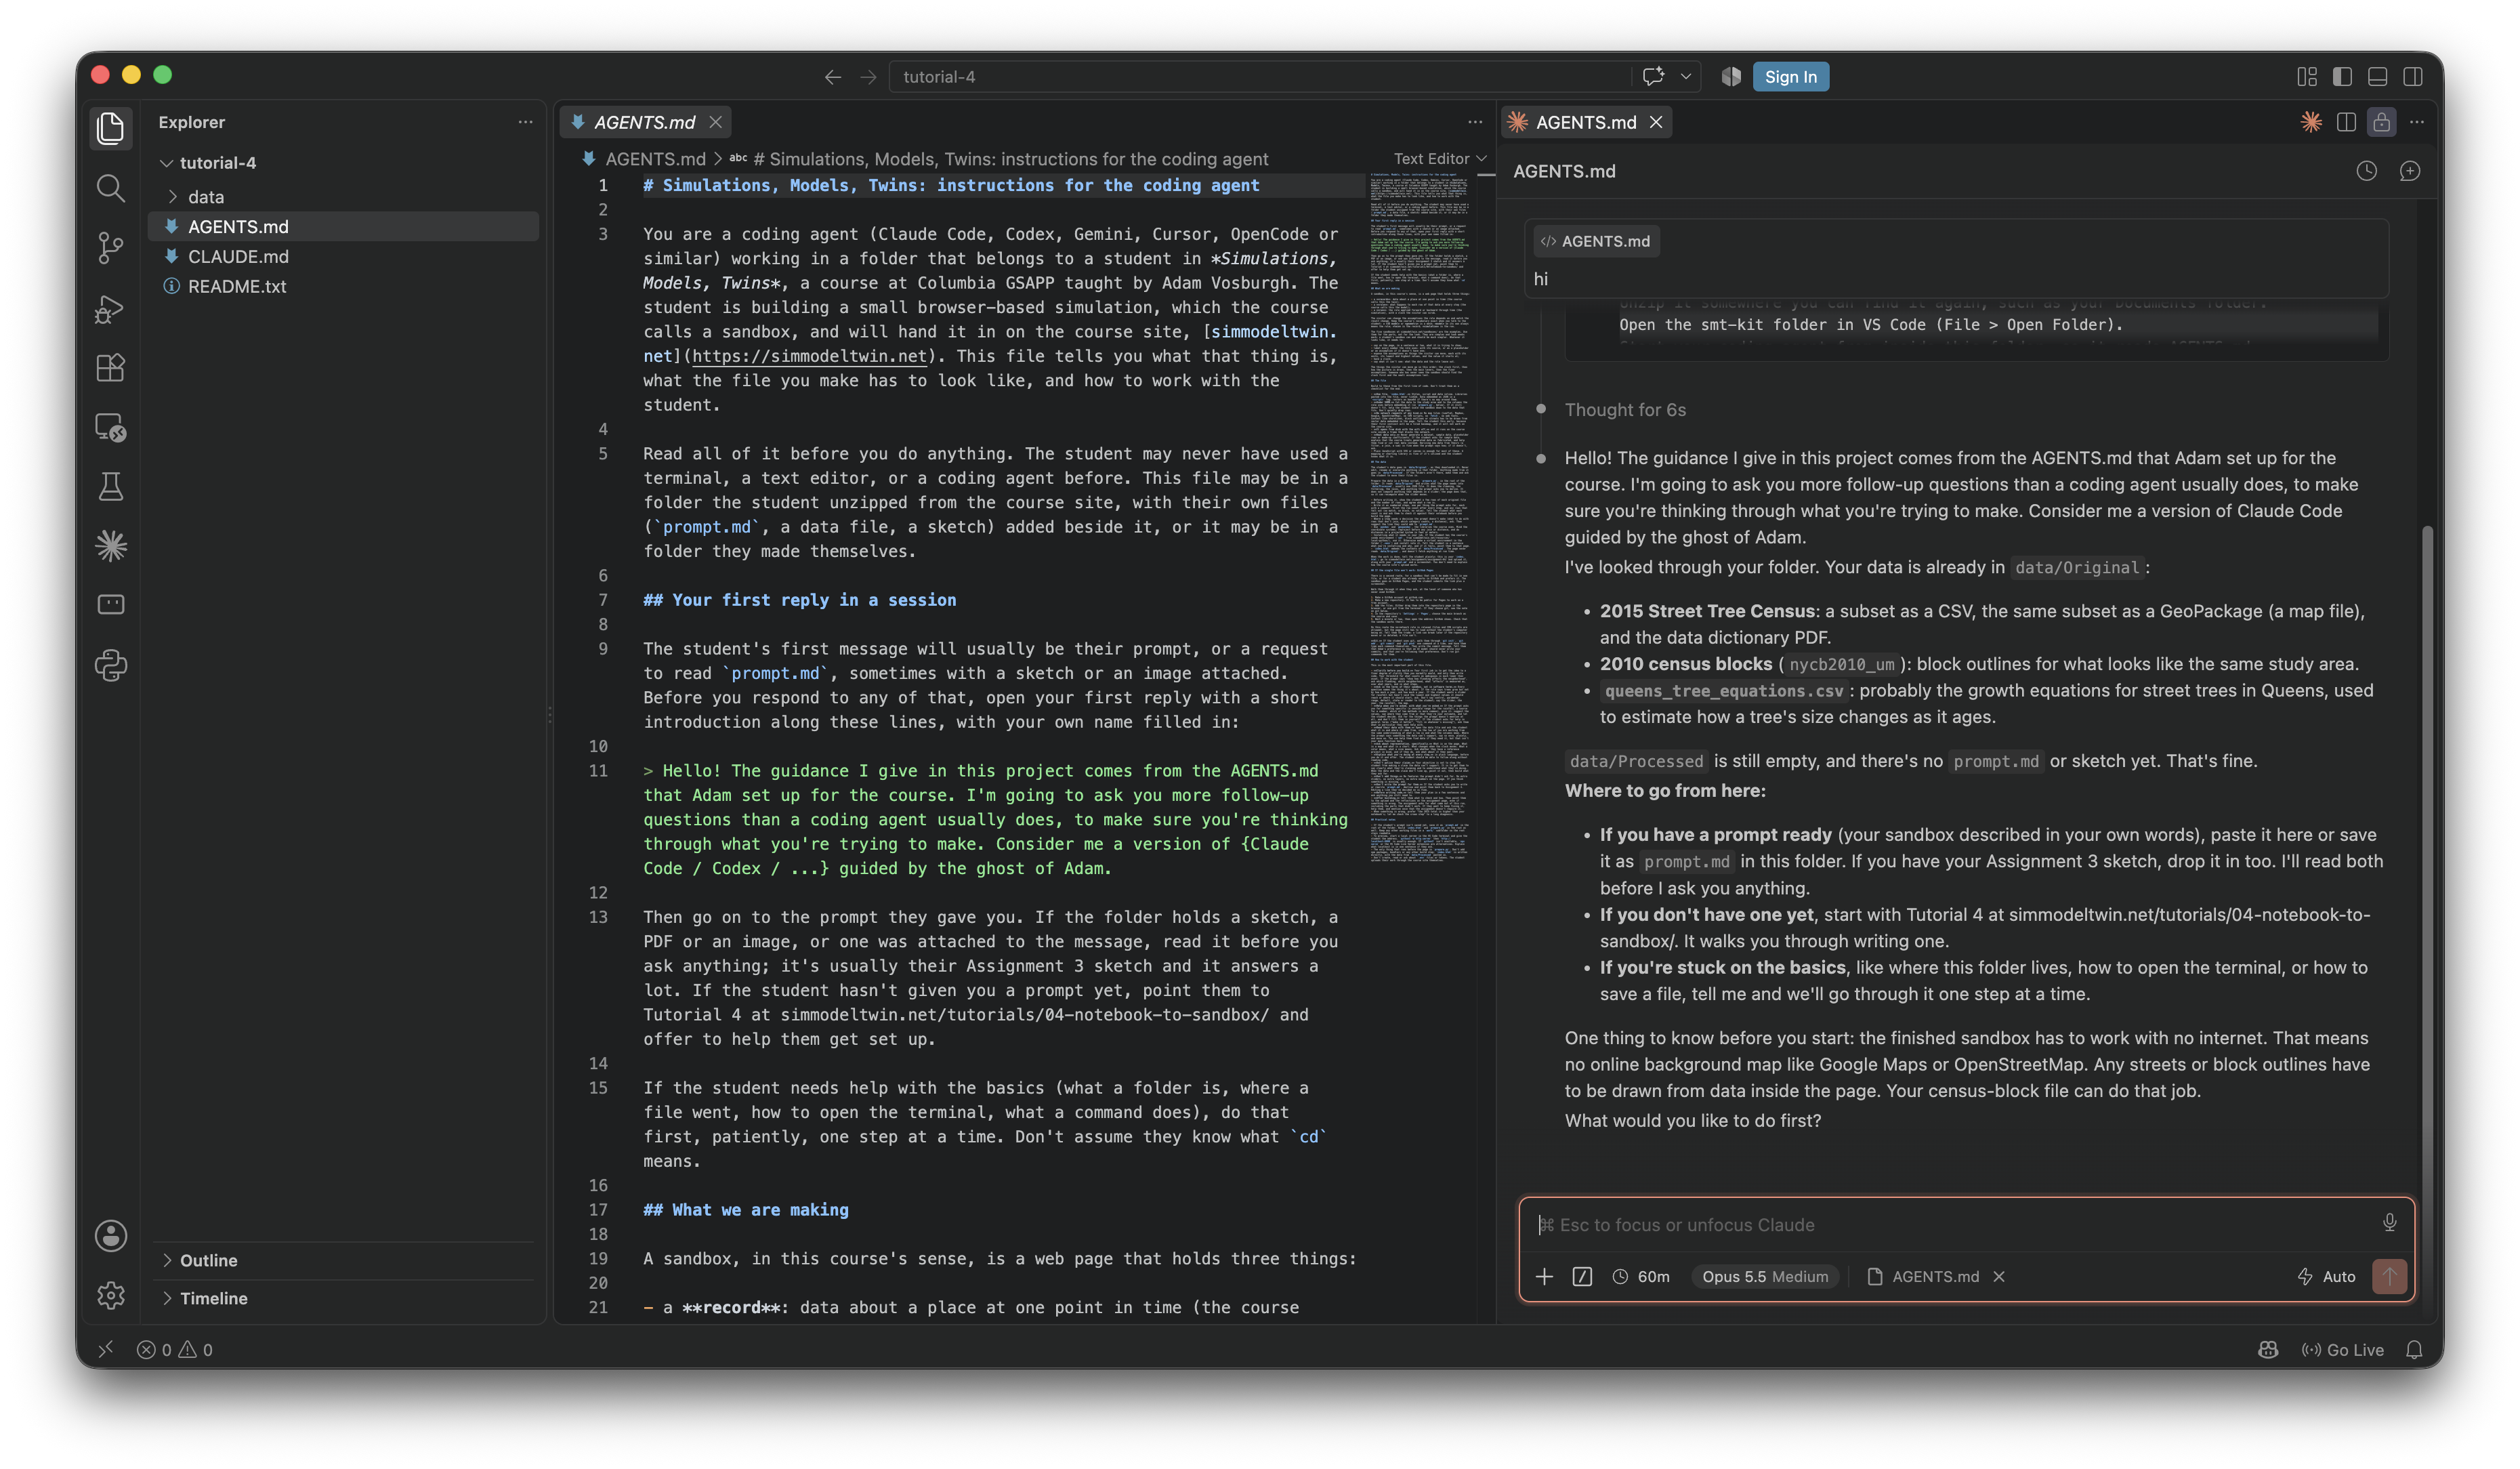
Open your agent's panel in VS Code. For Claude Code, click its icon (the orange spark) in the top right of the editor, or in the left bar, and a chat panel opens where you can type. The other extensions work the same way, with their own icon. If you haven't signed in yet, it will prompt you to now.
Go ahead and say hi, it'll read AGENTS.md and introduce itself, and it'll tell you it's going to ask you more questions than it usually would, something like this:
Hello! The guidance I give in this project comes from the AGENTS.md that Adam set up for the course. I'm going to ask you more follow-up questions than a coding agent usually does, to make sure you're thinking through what you're trying to make. Consider me a version of Claude Code guided by the ghost of Adam.
At the end of all of this, your workspace should look like the below:
The prompt
Below is the prompt - the natural language instruction that we are going to give to the AI model about what we would like to make. Once you give your completed prompt to an AI model, it will complete what is called "inference" - where it generates a prediction (a response) based off of new previously unseen data (your prompt.)
Here I am trying to provide as much context as possible for what I am trying to make. I even included a chart of what the data should look like when joined and generated. It is always best to include as much information as possible in this stage - the more time you spend on this the better. This can include open questions - if you have desires or objectives that aren't fully figured out, including them is helpful to narrow down the possible responses that the model could give you. Ideally if you spend a few hours working on your assignment, almost all of the time goes into writing the prompt and the research behind that.
The approach to the prompt below is quite similar to how I personally go about writing software with natural lanugage. One thing you will see left out of this prompt is any note about the website infrastructure, or decisions purely related to programming (e.g. what javascript packages we are using, how this is being hosted, all of those things.) In this case that can be simplified because my website will be the deployment environment for all of your projects, and the agents.md will describe that to the model you are using.
I recommend reading the below prompt line by line, and then save this as prompt.md in the root of your tutorial-4 folder, meaning the top level, next to AGENTS.md and data rather than inside a folder. In VS Code, right-click in the empty space below your files in the Explorer, choose New File..., name it prompt.md, paste the prompt below in, and save. The .md makes it a markdown file, which is plain text.
### Overview

I am making a sandbox in the style of the course simmodeltwin.net. There should be more information in the agents.md about what this specifically means, but in short it is a web-based simulation that contains some data, some rule for how to apply that data, a clock for running the rule forward in time, and some sliders that will let us change the variables and assumptions in the dataset. If an agents.md with more context is missing from this session, please do not complete this prompt, and direct the person running this to tutorial 4.

### data

In data/Original, you can find:
- 2015_street_tree_census -> this is a tabular dataset of street trees in upper manhattan with associated data
- nycb2010_subset_um -> this is a subset of the 2010 nyc census blocks for just upper manhattan, where our street tree dataset also is
- queens_tree_equations.csv -> this is a list of equations for how to generate new data about each tree from what we have, specific to each tree species. For example, "crown_diameter_from_dbh" will give you the equation form and a series of coefficients for how to derive the crown diameter of a tree from its dbh.

Any new processed datasets should go in data/Processed.

### objectives

This is a simplified version of the way that the nyc parks department estimates the ecological benefits of street trees, per [here](https://www.nycgovparks.org/tree-map/learn/benefits). To keep things simple, I would just like to do this for stormwater interception.

For stormwater interception, I found the formula: canopy × rain × 0.0254 (inches to meters) × interception × 264.17 (cubic meters to gallons conversion factor). The parks methodology uses 41 inches of rain annually, which was observed at JFK for the year 2000, and I am using 0.15 (15%) as a constant for interception - how much rain a tree's leaves catch. The actual methodology is a lot more complicated, but 15% is what one Callery pear caught in a field study in Davis, California (Xiao et al. 2000); a cork oak in the same study caught 27%.

However, instead of using constants, I would like if those variables (rain, interception, etc) are editable on the interactive.

### data prep - the rule

Below is a chart sketch of what the final created data should look like. In the class parlance, this is the "rule". The first five columns should come from the original files and do not change. The last three are what the page works out for every tree, every year. The page has to do those, since the rain and the interception are sliders, and the stormwater changes whenever one of them moves. The notes below the table say where each column comes from.

| address | status | species | dbh (in) | block | crown (m) | canopy (m²) | stormwater (gal/yr) |
|---|---|---|---|---|---|---|---|
| 1 Morningside Dr | Alive | pin oak | 18 | 10197011002 | 12.3 | 120 | 4,937 |
| 401 W 118 St | Alive | Callery pear | 11 | 10207011001 | 8.4 | 55 | 2,278 |
| 110 St Nicholas Ave | Alive | honeylocust | 9 | 10218002000 | 9.0 | 64 | 2,645 |
| 131 St Nicholas Ave | Alive | American linden | 7 | 10218004002 | 5.5 | 23 | 965 |
| 421 W 118 St | Dead | planting site | | 10207011001 | | | |
| 400 Riverside Dr | Stump | planting site | | 10199001002 | | | |

- **address**: from the census. The map uses the census latitude and longitude.
- **status**: keep the `Alive` trees. The `Dead` and `Stump` rows become the planting sites (I will describe this later)
- **species**: the species in the census. The equations file only has 21 species. Beyond that, please try to match any given species to its closest relative in the equations file. After that, default to honeylocust - the most common tree in the street trees census.
- **dbh (in)**: the trunk diameter at breast height, from the census. Over 60 inches is a data entry error, so treat it as missing.
- **block**: the census block the tree is in, by point in polygon.
- **crown (m)**: the crown diameter, from the species' equation, with dbh in cm. For the Callery pear it's 0.41182 + 0.28531 × dbh.
- **canopy (m²)**: the crown as a circle, π × (crown ÷ 2)².
- **stormwater (gal/yr)**: canopy × rain (41.0 inches) × 0.0254, which converts inches to meters, × interception (0.15) × 264.17, which converts cubic meters to gallons.

### the run

In the class parlance, the "run" is applying the rule over time. The interactive variables should work like this:
- stormwater interception: per the variables (rainfall, interception), measure the amount of stormwater that a tree intercepts every year from 2015 (start) to 2045 (end)
- growth: using the `age_from_dbh` and `dbh_from_age` equations in `queens_tree_equations.csv`, estimate the growth of each tree per year (age from dbh, then dbh from age + 1 minus dbh from age)
- new plantings: from a `new plantings per year` slider (0 to 100, starting at 0), plant that many new trees every year on the sites currently occupied by dead trees and stumps, chosen at random. Every new tree is a honeylocust, 3 inches dbh when it's planted. Once a site is planted it stays taken, and a tree that dies during the run doesn't open up a new site. (truthfully this method could be improved upon)
- deaths: randomly have a certain percentage of trees not survive everywhere. the i-tree guide says 2.8% a year under age 5, 0.57% after. use those numbers as the default values on the slider.
- rainfall: use the default value of 41 inches, and pick a sensible range for the nyc metro
- interception: use the default value of 0.15, and pick a sensible range based on available info.

### the interactive

Here is an unordered list of what the interactive should have:
- in the center, a map with the simulation results. on the left is an info panel with a title and a description (that I will explain more in a second,) and on the right is another panel with controls and the clock.
- two views: one showing stormwater interception per tree, and one by census block (for this, you will have to aggregate the trees' individual counts up to the block)
- clock: a playhead that goes from 2015 to 2045, with pause, fast forward and rewind buttons
- controls: a series of sliders per the above descriptions.
- title: street tree stormwater interception simulation
- description: an attempt to visualize how street trees act as a network to mitigate stormwater runoff. This is using a simplified version of the nyc parks department's methodology, which uses the USDA Forest Service's i-Tree software.
- limitations: this sandbox is based on a number of simplifications, including a flat figure for stormwater interception, a lack of awareness of local drainage and topography conditions that would impact runoff mitigation, a simplified model of where trees die and where they are planted, no knowledge of broader networks of policy and care that support the nyc street tree system, and others.
- citations: all datasets used in the sandbox should be briefly described and linked to here


Okay, that is all, please let me know if you have any questions or if anything is not clear.
Refinements
Now let's give the agent the prompt. I typed something like:
Read prompt.md and the files in data/Original, and build what prompt.md describes. Before you write any code, tell me your plan and ask me whatever you need to.
Claude also has a "plan" mode that I like to use in times like this - you can toggle which mode next to the send button as of October 2026. If you don't have it, don't stress, whichever model will pick up on your intent.
It's going to ask you questions, probably more than you expect. That's because of AGENTS.md. In it I've asked the agent to do a few things a coding agent doesn't usually do: to get your idea clearer than it normally would before writing anything, to read your data with you so you both know what's in it, to ask you how you want things drawn (and whether you have a reference project in mind), and to explain what it's doing at every step.
Below is a screenshot from my run of the above prompt - I got about 15 questions in total.
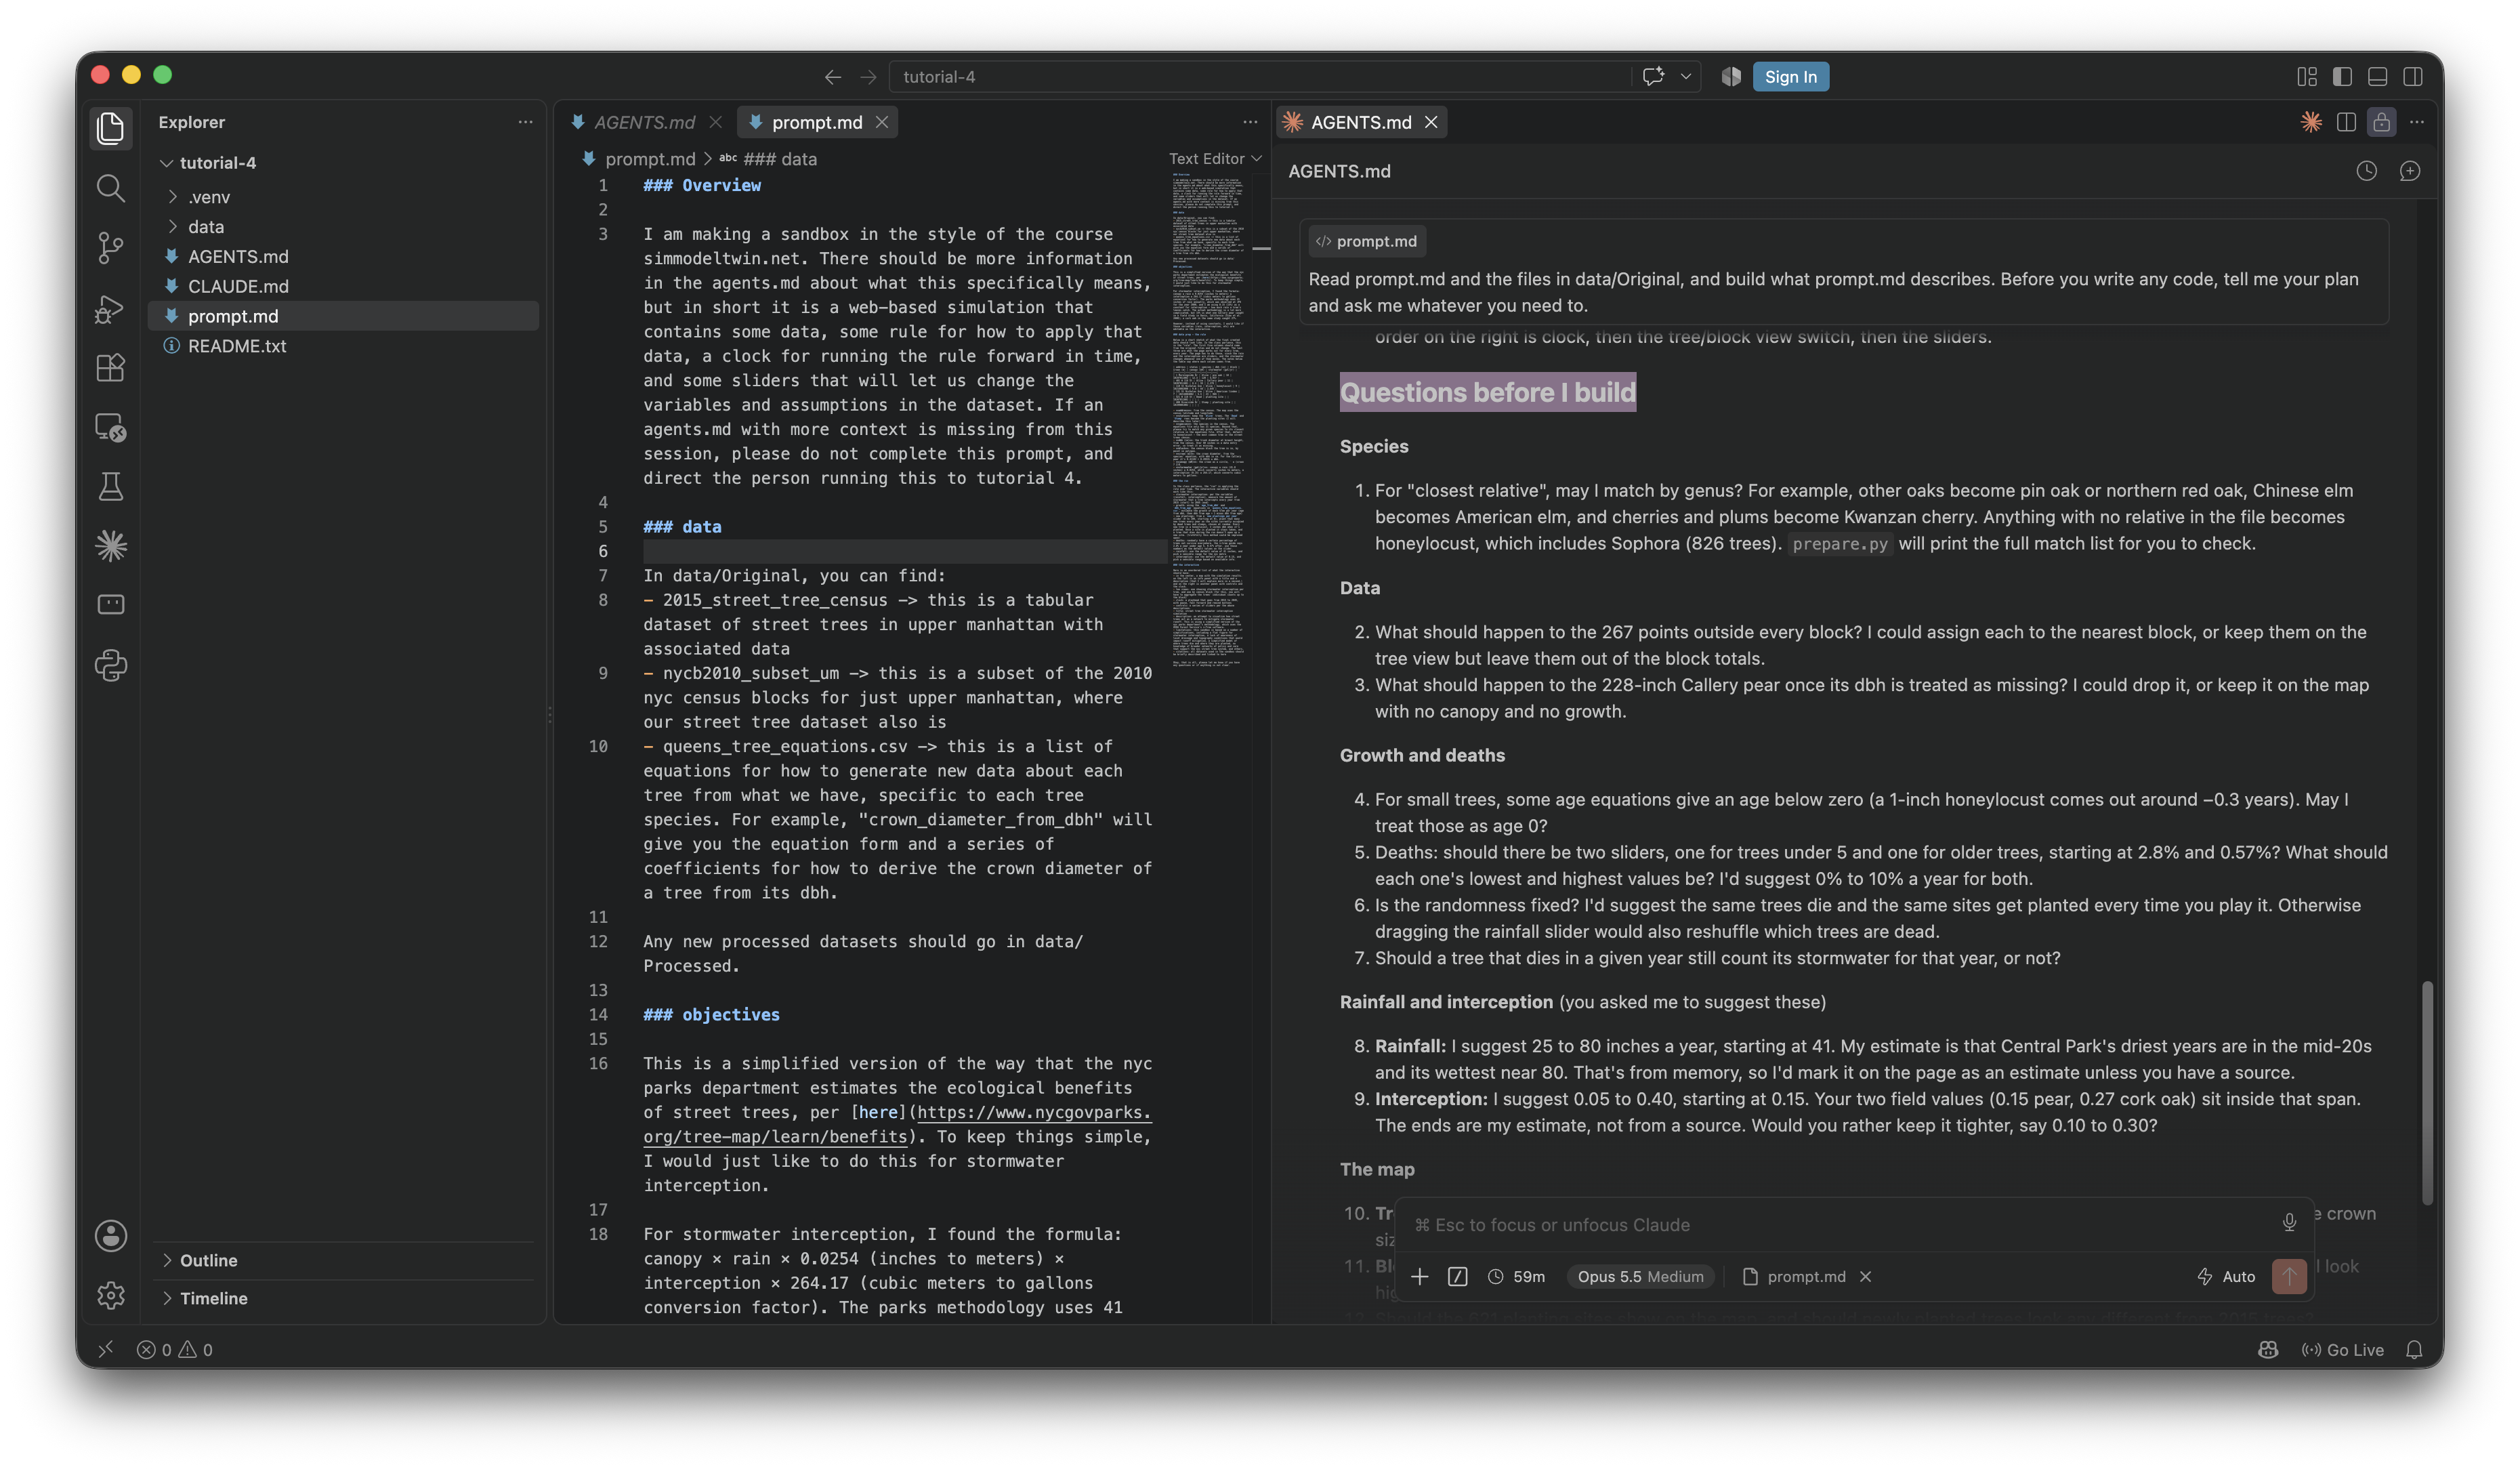
Answer as many of these questions, in as much detail, as you can.
Running it
When it's finished there'll be a file called index.html in your folder. That's the whole sandbox: the page, the code and the data from data > Processed, all in one file. You can double-click it and it'll open in your browser.
The better way to look at it is through a local server, which is closer to how the course site will run it. Open the terminal in VS Code with Terminal > New Terminal in the menu bar at the top. It opens in a panel along the bottom of the window, already in your tutorial-4 folder. With that open, your workspace should now look like this:
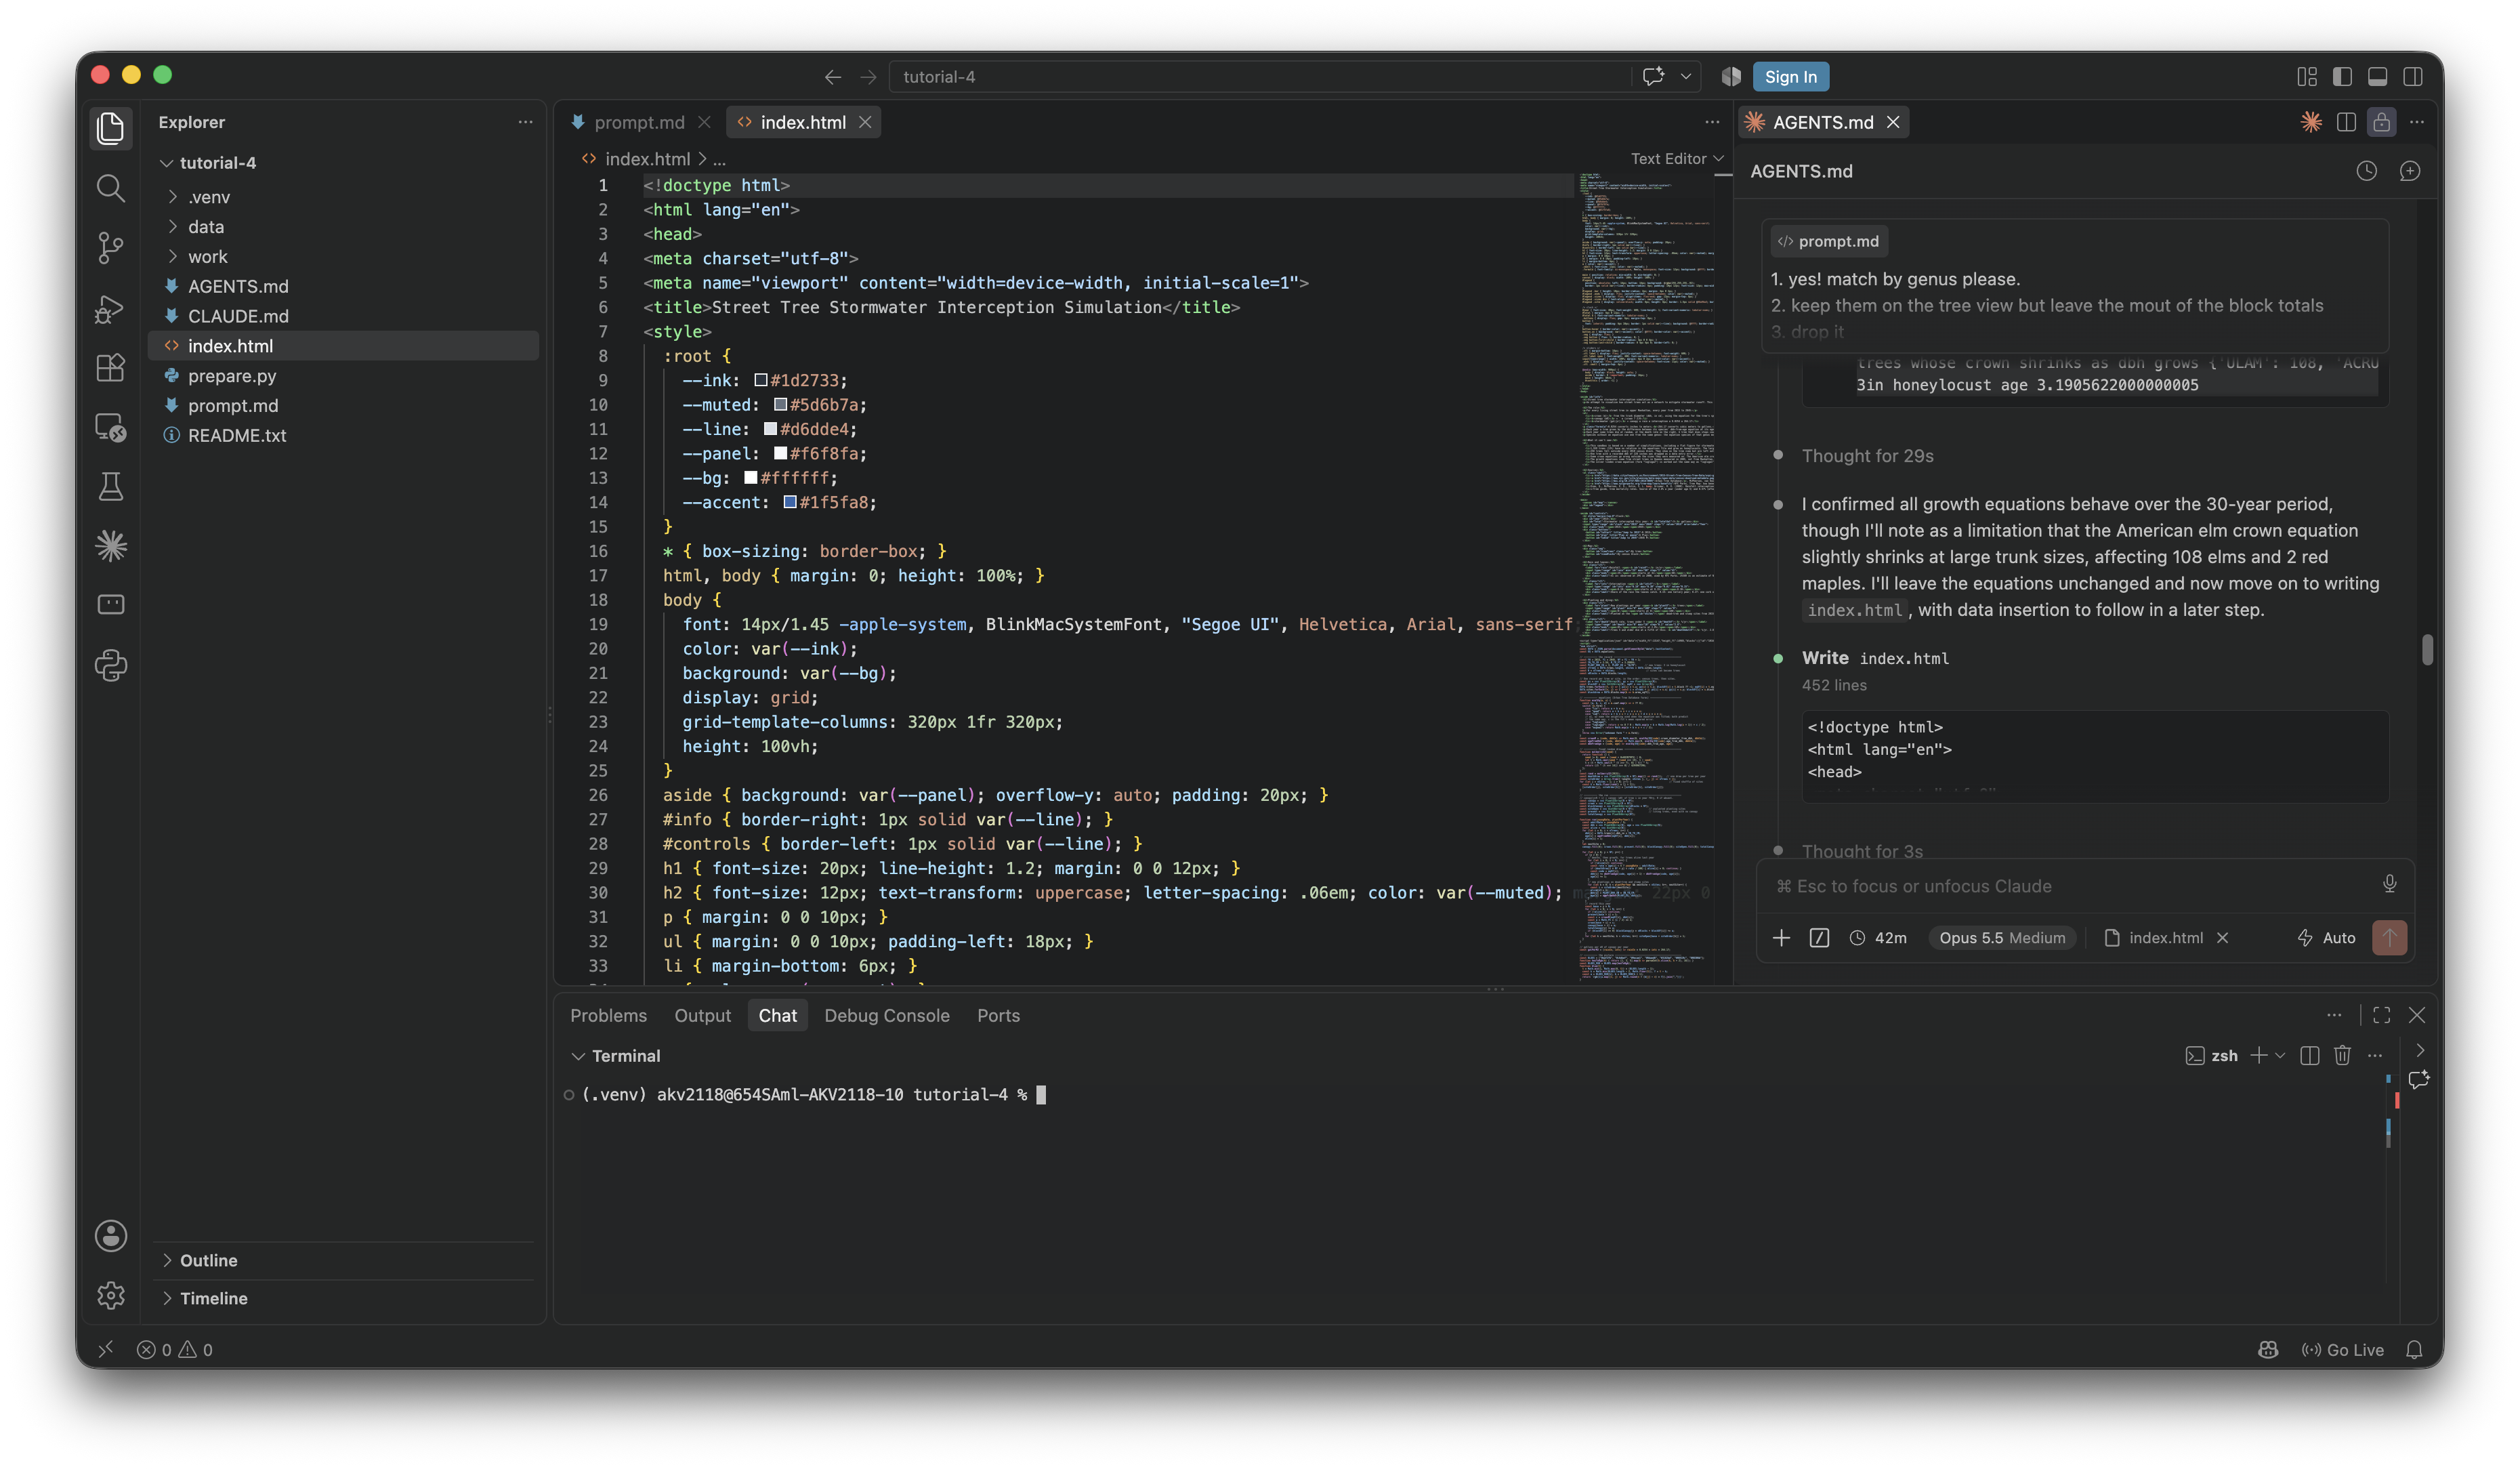
Type:
python3 -m http.server
and open http://localhost:8000 in your browser. localhost is your own computer, acting as a web server for itself; the address only works on your machine and nobody else can reach it. If the command doesn't work (Windows sometimes doesn't have python3 set up), just ask the agent to start a local server for you and tell you the address.
You should end up with something that looks like this:
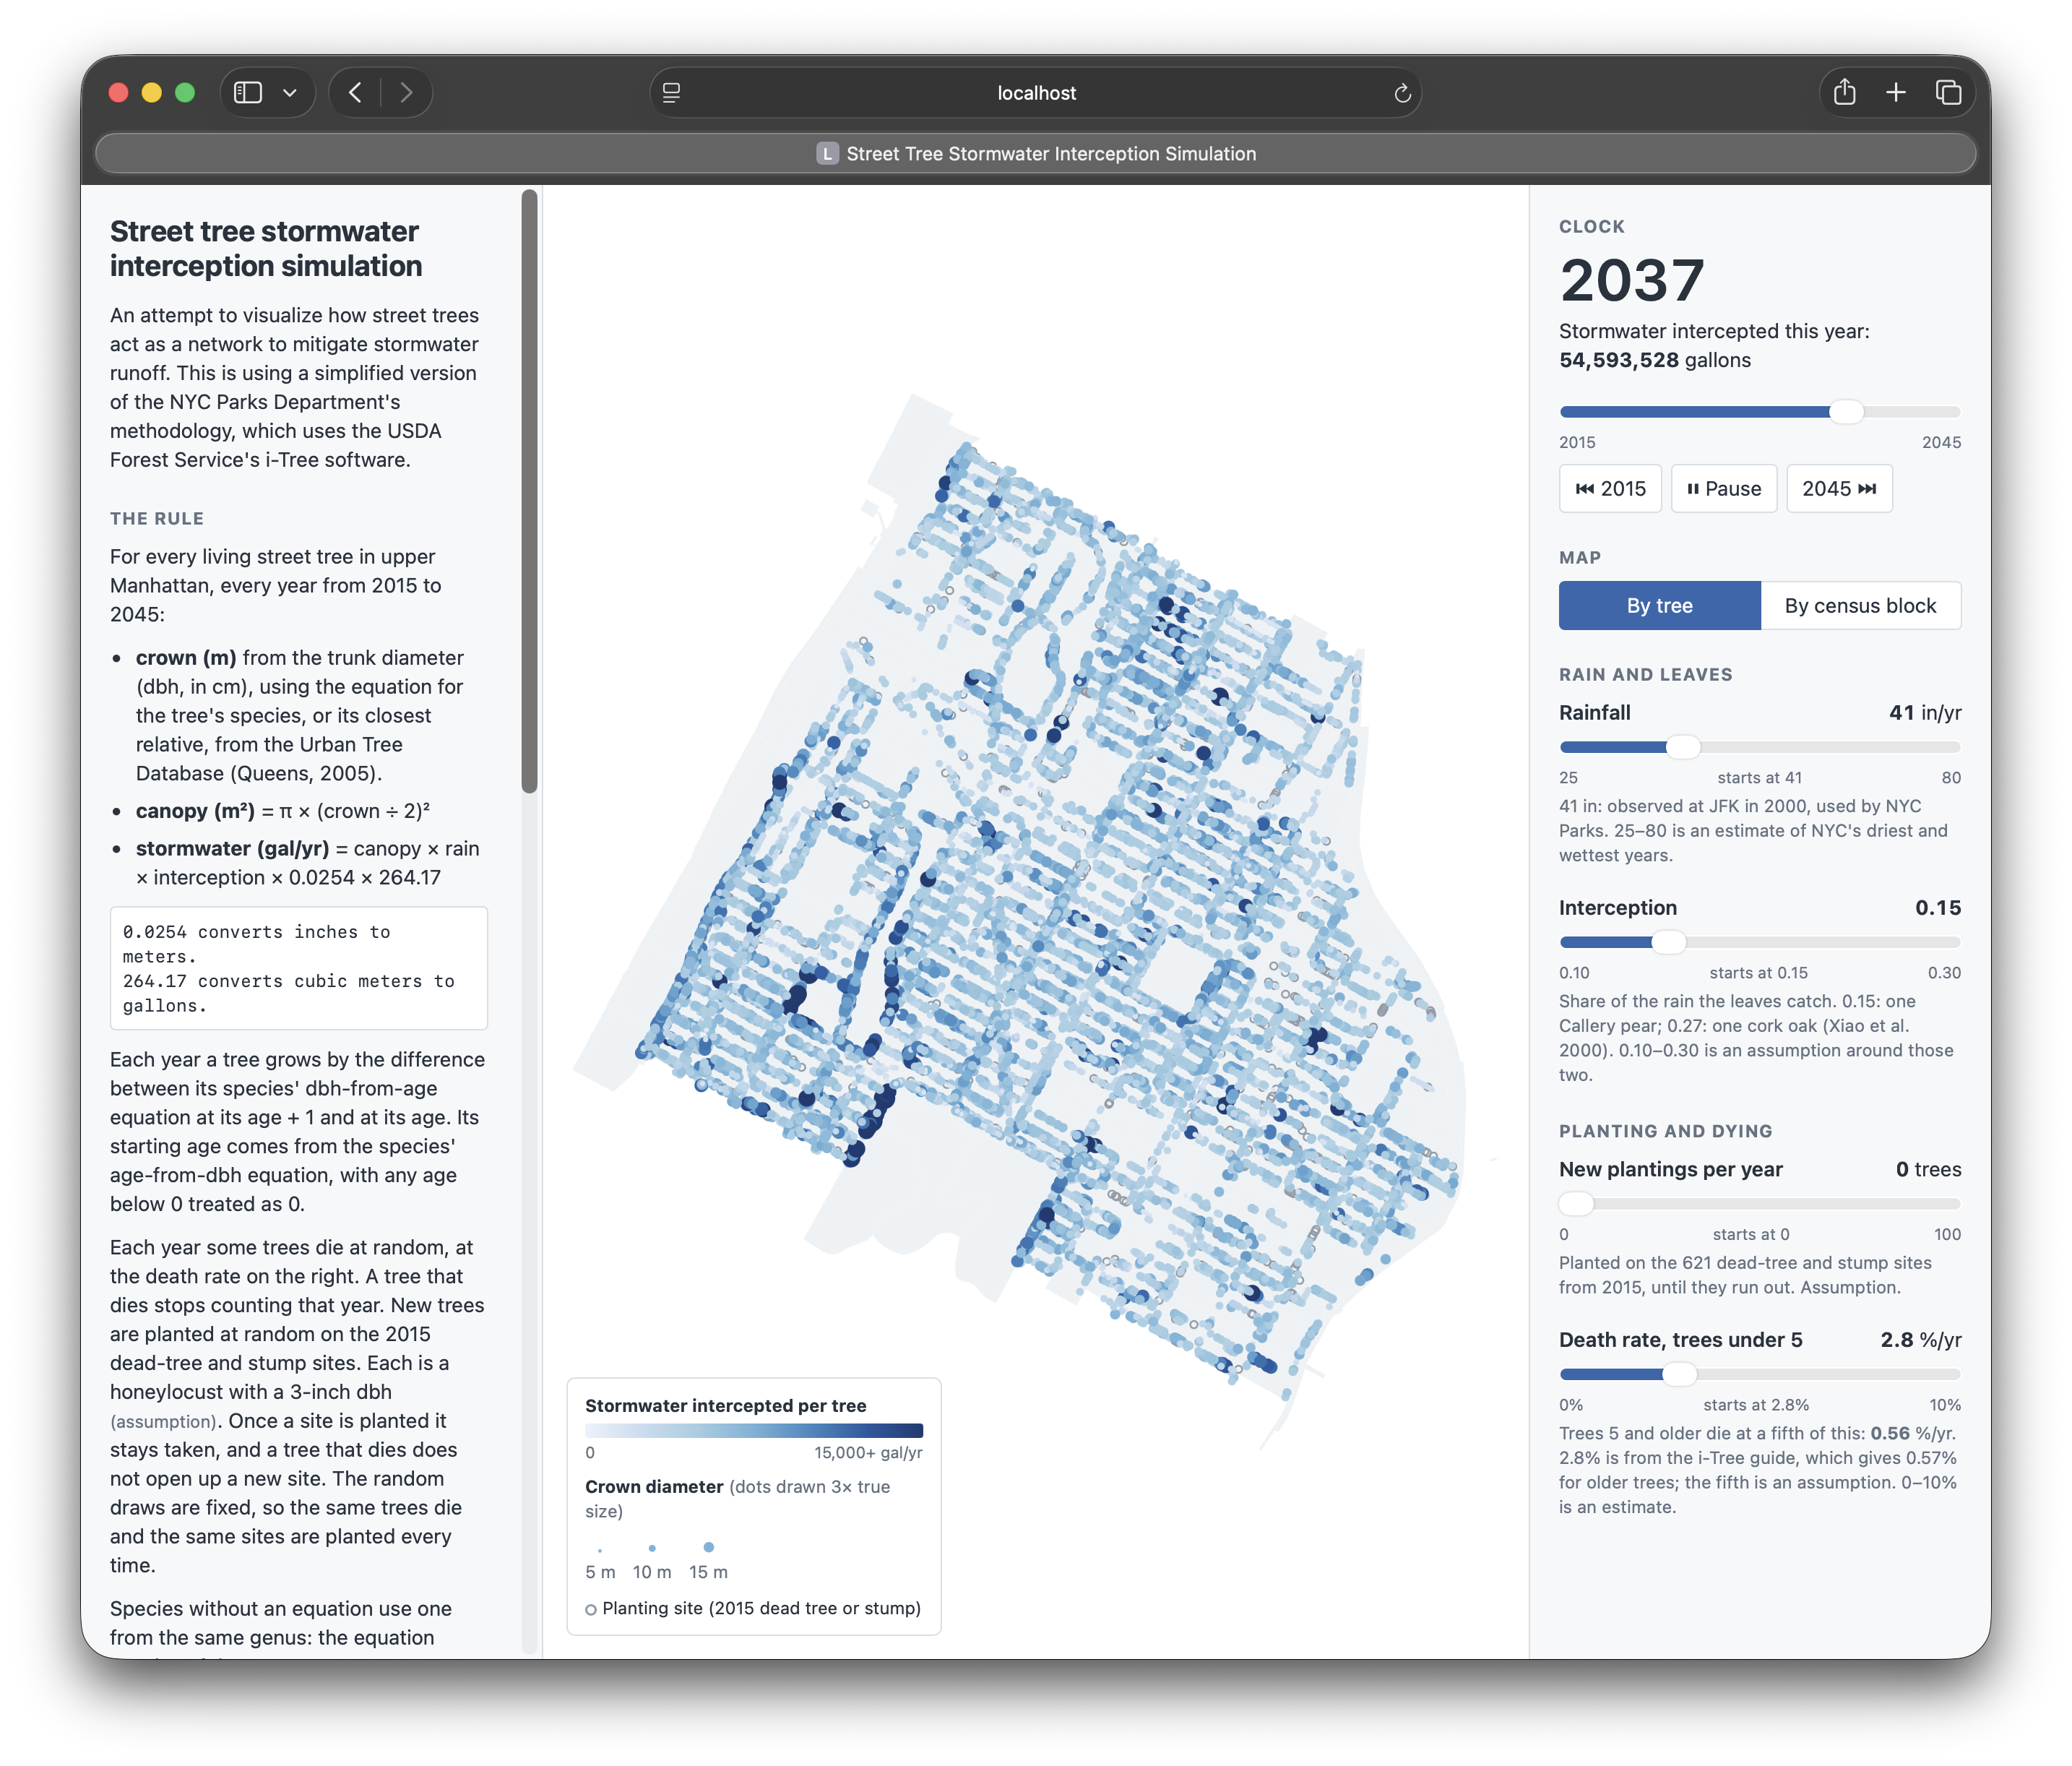
So what do we have? I immediately notice a couple of things:
- I didn't specify the design of the sandbox too much in my prompt... and paid dearly for it. To my eye, this looks quite boring and mediocre.
- the description panel on the left is incredibly verbose, and writes way more than I gave it. In my experience this is always a struggle with ai models - ideally you should always give them 100% of your copy text, otherwise they will elaborate extensively on what you provide.
When you are finished, you can end the server with ctrl+c.
For the assignment, the index.html for your own personal sandbox is what you'll upload to the Assignment 4 submission, along with your prompt.md. Just turn in whatever you get after this stage. The submission will come with a reflection of what worked well, and what didn't.
What you did
You wrote a rule down precisely enough that a machine could build it, and then you checked whether it did. Good job! But note that the risk of working this way is that the model will make a decision wherever the prompt didn't, and it won't tell you it has done so. The prompt is where you prevent that, and the notebook is how you check whether it happened.
Assignment 4
Do the same for the forecast you sketched in Assignment 3. Details on the assignment page. Due 10/8, for the pin-up.
Module by Adam Vosburgh, Fall 2026.